Paper - I generally use papers from Drawing books(classmates),I've just recently started using it, and it is really good. I've found that I've had to shade a lot heavier, but drawing is much quicker using it. If you do not have access to a good art shop, try to find paper that is at least 135gsm, and relatively smooth.
Pencils - I cannot stress the importance of having high quality pencils. I find Cretacolor/Apsara/Lyra are definitely the best I've used, in particular their sketching range.These are really black pencils (though not coloured pencils) which are essential for depth, as well as creating effective and dramatic drawings. If you do not create a high enough contrast, your drawings can appear flat and dull. I use 2B/4B, as this is soft enough to blend and can cover light and medium shades well. The 6B/8B covers dark to black black shades, and can be used over the Cretacolor sketching to help with gradual tones. If your pencil becomes too short, use a pencil extender because there's no need to make it uncomfortable to draw. If the wood around the lead of your pencil is rough, it is a sign you need a new pencil sharpener.
Blending Tools - To hide pencil lines in a drawing, you need a blending tool of some sort. I use eyeshadow applicators because they give a really smooth, and almost translucent finish, but they can also give a rougher finish. These can found in any shop that sells make up, but can be found in bulk on some online stores. A very popular option for blending is tortillion, which can be found usually in any shop with basic art supplies. I bought a set of six different sizes by Crimson + Blake from The Works for 99p, though you can make your own. In my personal experience, tortillion is very quick to use, and due to its point can do detailed areas well, though I tend to get a much rougher finish than with eyeshadow applicators. I have heard of people using cotton buds, cotton wool and tissues. You might want to practice blending with a few different items to see which suits you best. With this tutorial, I shall be using eyeshadow applicators
Kneadable Erasers - I find that a normal eraser is really useless for drawing. Most pencil artists use a kneadable eraser already, but in case you don't, my favourite is WH Smith's own brand. (N.B. Don't buy anything else from WH Smiths for art - especially pencils - they're absolutely dreadful.)
(You can Buy Full Pencil Drawing Kit From Here)
START YOUR WORK
Make sure your hands are clean and dry before drawing. You can rest a tissue(OR JUST A CLOTH OR PAPER) under your hand as you draw to stop it ruining your paper with oil from your skin.
it's best not to draw with paper flat on a desk. It distorts proportions and unless you hunch over you never get an accurate view. Try to recreate the angle an artist painting at an easel has. A table easel is good, as well as leaning a drawing board against a desk, though I tend to use one of those lap trays for your dinner and sit lengthways on a sofa.
(this will also helps you not to get neck pain)
Remember, if you move your paper, move your reference and mentally adjust.
you can watch TV or hear music while you draw..its completely upto you.If you are drawing a celebrity, watch something that they are in, as it will give a better understanding of their features.
When choosing a reference, choose carefully. Think about what you want to achieve with your drawing. If you are drawing an image of a celebrity, do you want it to be refreshing or iconic? For example,if you opt to draw Sachin Tendulkar,try to select a reference picture which is not so familiar to public..It will attract the people to your work which is not a familiar one to them
Choose a high quality image. If the reference is not of a high quality, your drawing won't be either. some magazines are a good source(Sports star,FilmFare etc)
Whatever your interest, it can usually be found on
This is the references I have chosen:

Outlining
It's important to outline an image before you draw in detail. I didn't use to do this, and my drawings suffered because of it.
A lot of people draw what they think they see, not what they actually do see. People who are trained in art observe things better - with precision, and they can draw detail because they actually observe the detail of what they see, and then draw it. For example, I know all the flaws in my drawings, because of how I observe. For an attempt of drawing after reading this, I advise drawing Marilyn Monroe, as Cardiff goes on to explain: "If you could measure Marilyn's eyes and facial features, they were almost perfect". Therefore, she'll be good for the experience of drawing, while someone whose features aren't symmetrical would be better to do after practice.
Please remember to draw what you see, not what you think you see!! E.g. nobody has eyelashes like spider legs, but people still draw them like that!

This is done by freehand, but by all means use a grid if you want to.its a little hard to use, but I know they work wonders, I used circles and sausages, and then built up the correct shapes after the basic shapes:

This is was a basic shape drawing would look like. You can easily see what needs to be altered to get the right shape. N.B. Look how well Marilyn's face fits the proportion lines, proving Cardiff's observation.
You can make sure things are accurate by looking at relative measurements
You can make sure things are accurate by looking at relative measurements


The arrows on each left eyebrow are the same length as the arrows on each right eyebrow

Looking out for things that should meet up, should help with accuracy. E.g. The light and dark hairlines meet in the small circle, while the hairline, end of eyebrow and eyelashes meet up in the bigger circle. If things that are meant to meet up but don't, look carefully at your drawing and see what needs to be changed so that they will meet up.
It is important while sketching to step back, as this gives you a good overview of where things are going right and wrong. If you are having difficulty with something, stop drawing and don't look at it at all for a while. This will give you fresh eyes when you do look at it again. I find that photographing my works in progress next to their references on my phone gives a direct comparison and as it's a small screen, it makes things that need changing more obvious.
At this stage, all drawing lines should be very light. You shouldn't be able to tell you went through this stage at all in the finished drawing. The outlined drawing may look odd and not accurate because dark shading is needed to make some areas look smaller and give a more defined shape. Put in some light shading if you're worried about it not being accurate.
Background
When shading and adding detail, it is important to move in these directions.

Which direction you follow depends on which hand you use because you should move in a way in which you drawing hand doesn't smudge what you've already drawn. Because of this, it means usually starting with background or sometimes the hair. If you use a tissue under your drawing hand to protect the paper, you can get away with not following this order. If you are comfortable with this, do the eyes first, as they make or break a portrait!
As I'm right-handed, I'll be starting with the top left corner.
As I'm right-handed, I'll be starting with the top left corner.

First of all, shade the mid tones of the background fabric with your 4b pencil. With something that's out of focus, like this background, you can get away with not shading tightly, but it is essential to do so when shading the skin.

Now, to remove pencil lines, you need to blend with whatever blending tool you are using. I blend in a slightly circular motion that gradually moves in the necessary direction of the subject. If you are blending something detailed and intricate, there is no need for the circular motion.

After you have done that, you should place the darker tones in with your black graphite pencil (a Mars Lumograph in my case). Shade tightly as they don't blend well, and shade lightly when shading the gradient between mid to dark tone.

Blend again to ensure that the regular graphite and the black graphite merge smoothly.Add more black if necessary as you want a solid black to as high a contrast as possible.

Using your kneadable eraser, tear a piece off and knead it into this kind of shape:

Then using the pointy part, pick out highlights in the background. Most blending tools don't blend 100% smoothly, so this technique can be used to remove flecks of graphite that make the tone uneven. Make the eraser thinner for more delicate highlights.
Those are the steps I went through for drawing the background. I then completed as much as the background that fell within the direction I was working in, so it looks like this:
Those are the steps I went through for drawing the background. I then completed as much as the background that fell within the direction I was working in, so it looks like this:

Hair
After doing the background, you may notice some excess graphite dust has gathered on the white paper around it. It is important to erase this when you go to draw an area, so that the paper is cleans as when you first started your drawing.
The only way to effectively draw hair, is to give the impression of individual hairs - This rule applies to both blonde and dark hair.
Put in the mid tones with your 4B pencil. Note how I have shaded this time, giving the suggestion of individual strands.
Blend, this time no circular motion should be used, instead move in the direction the hair goes.


Add the darkest tones with your black pencil, still drawing the individual strands where needed.

Using your kneadable eraser, pick out the highlights.

You should be finished now, but I needed to make the light and dark stronger. This is something you should be consciously aware of in any drawing you, as contrast is very important to the finished image.

Skin
The use of eyeshadow applicators is most noticeable and beneficial when shading skin, as it creates a translucent, glowing effect.

As always, shade your mid tones. Remember to erase excess dust before you start.

Blend with the eyeshadow applicators in a circular motion.

If there are any shades that are too dark, pick them out with the kneadable eraser.

Blend again to even out the light and mid tones. Don't forget to follow the reference's dark and light tones.

Eyes and Eyebrows
I think the eyes are most people's favourite features when drawing, so it's important to give them justice. I used to be terrible at drawing them, so I practised just drawing eyes, and now I'm alright. As they're usually central in a portrait, they're what people look at first, so if something's off, it tends to be very noticeable.

Firstly, give an all over shade and blend for the eyebrow, using the 4B.

While using the Mars Lumograph, draw individual eyebrow hairs.

Use the kneadable eraser in a point to pick out light areas.

Using the same instructions on skin, draw the eyelid skin between eyelash and eyebrows.

Using the Mars Lumograph, add the eyelashes.

Using the 4B Derwent, shade the iris and very lightly shade the white of the eye. The white, is never completely white and looks flat if shading is not added. As this shading has to be subtle, you may even want to use an applicator that already has graphite on it, instead of a pencil.

Using the 4B Derwent, shade the iris and very lightly shade the white of the eye. The white, is never completely white and looks flat if shading is not added. As this shading has to be subtle, you may even want to use an applicator that already has graphite on it, instead of a pencil.

Back to the 4B now. Lightly shade under the eye. Beware of the inner lid, and draw it if it is there in the reference.
Use the Mars Lumograph to draw the lower lashes, and kneadable eraser to highlight areas not covered by shadows of the eyelashes.
And Further shade the skin under the eye.

Nose
The nose is very difficult to draw, and indeed do a tutorial for because it is only composed of shading. Proportion wise, usually if the nose is incorrect, the chin and other features look out of proportion.

Using the 4B shade the midtones.

Blend with eyeshadow applicators.

With the kneadable eraser, remove uneven tones.

Still using the 4B, add darker shading, and blend and erase when necessary.
(Sorry for the weird appearance - scanner mishap!)
(Sorry for the weird appearance - scanner mishap!)

Now add the Mars Lumograph shading.

Now add highlights using the eraser.

Mouth
Mouths can be difficult to draw and vary so much, meaning one technique is not necessarily suitable for everyone's mouths. For example, in this reference, Marilyn's lips are very glossy. However, as long as you go by the principle of drawing what you see and shade well, you should be fine. I felt it necessary to have teeth in my tutorial, as so many people have commented on how difficult they are, so I hope I help!

Shade the mid-tones of the upper lip with your 4B pencil.

Blend with applicators.

Ordinarily, I would highlight last, though as the Lumographs are difficult to erase, it's best to highlight first when a reference has the lightest and darkest shades so close together.

Add the dark shade of the Lumograph and blend if required. Erase any dust from the teeth when you have finished, making sure they're clean to shade them in.

Lightly shade the gums.

Using an applicator alone, lightly shade the teeth. Think delicate!

Add the teeth lines. I would say this is the only time when the 'draw what you see' rule does not apply. The lines of teeth rarely ever look right, even when drawn completely accurately to the reference. Instead what you must do is give a suggestion of the lines by starting the line from the top of a tooth, and starting it at the bottom, but drawing hardly anything in between. After that is finished, erase areas that are meant to be highlights.

Shade the inside of the mouth, and the lower lip as you shaded the upper one.

Diamonds
The diamonds in my drawings have received their fair share of comments, so I felt that I had to feature diamonds especially, and they're not that difficult to do.


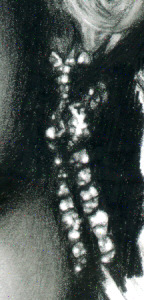
Now highlight further with your eraser until the diamonds look really sparkly.

Finishing Touches
As I left out her diamond necklace, her neck looks too long, so I cropped it to this:

I think the main difference between this and the reference is that her face is at different angle... which isn't the greatest tragedy and not bad considering I didn't use a grid.
When scanning your image, make sure you use your scanner properly to make the most of your drawing(other wise you can ask for the help of a professional photographer,he can take good image with light adjustments)
Don't be worried if this tutorial doesn't work for you, and by all means ignore anything and everything I've said if you want to try something different. Art is not meant to be restrictive!
if you have any doubt at any stage...you can ask it as a comment below or you can mail it to my email id nithin9mk@gmail.com
All the very best.....Happy Drawing :)
Add a comment